A complete, friendly walkthrough of the app — from sketching your first member to reading every diagram. Same flow the app teaches in one tap: Sketch · Load · Analyse.
iStruct2D · Beta · Reflects the current App Store build
01
The workflow at a glance
iStruct2D turns four moves — draw, support & load, analyse, read — into a fluid, tactile loop. Sketch a beam, frame or truss by hand, load it the way a real structure is loaded, tap once, and watch how it carries that load. Everything below expands on these four steps.
01 — DRAW
Sketch members
Drag to place each member. Shared ends weld into a node automatically; endpoints snap to the grid.
02 — SUPPORT & LOAD
Restrain & load
Drop pins, rollers and fixed supports onto nodes; add point, moment and distributed loads onto members.
03 — ANALYSE
Solve in one tap
Tap Analyse. Each connected structure is solved on its own with the direct stiffness method.
04 — READ
Read the behaviour
Toggle reactions, shear, bending, axial and deflection. Scrub any member for exact values.
New to the app? Tap How it works on the home screen any time to replay the in-app animated tour — the same seven steps this guide expands on.
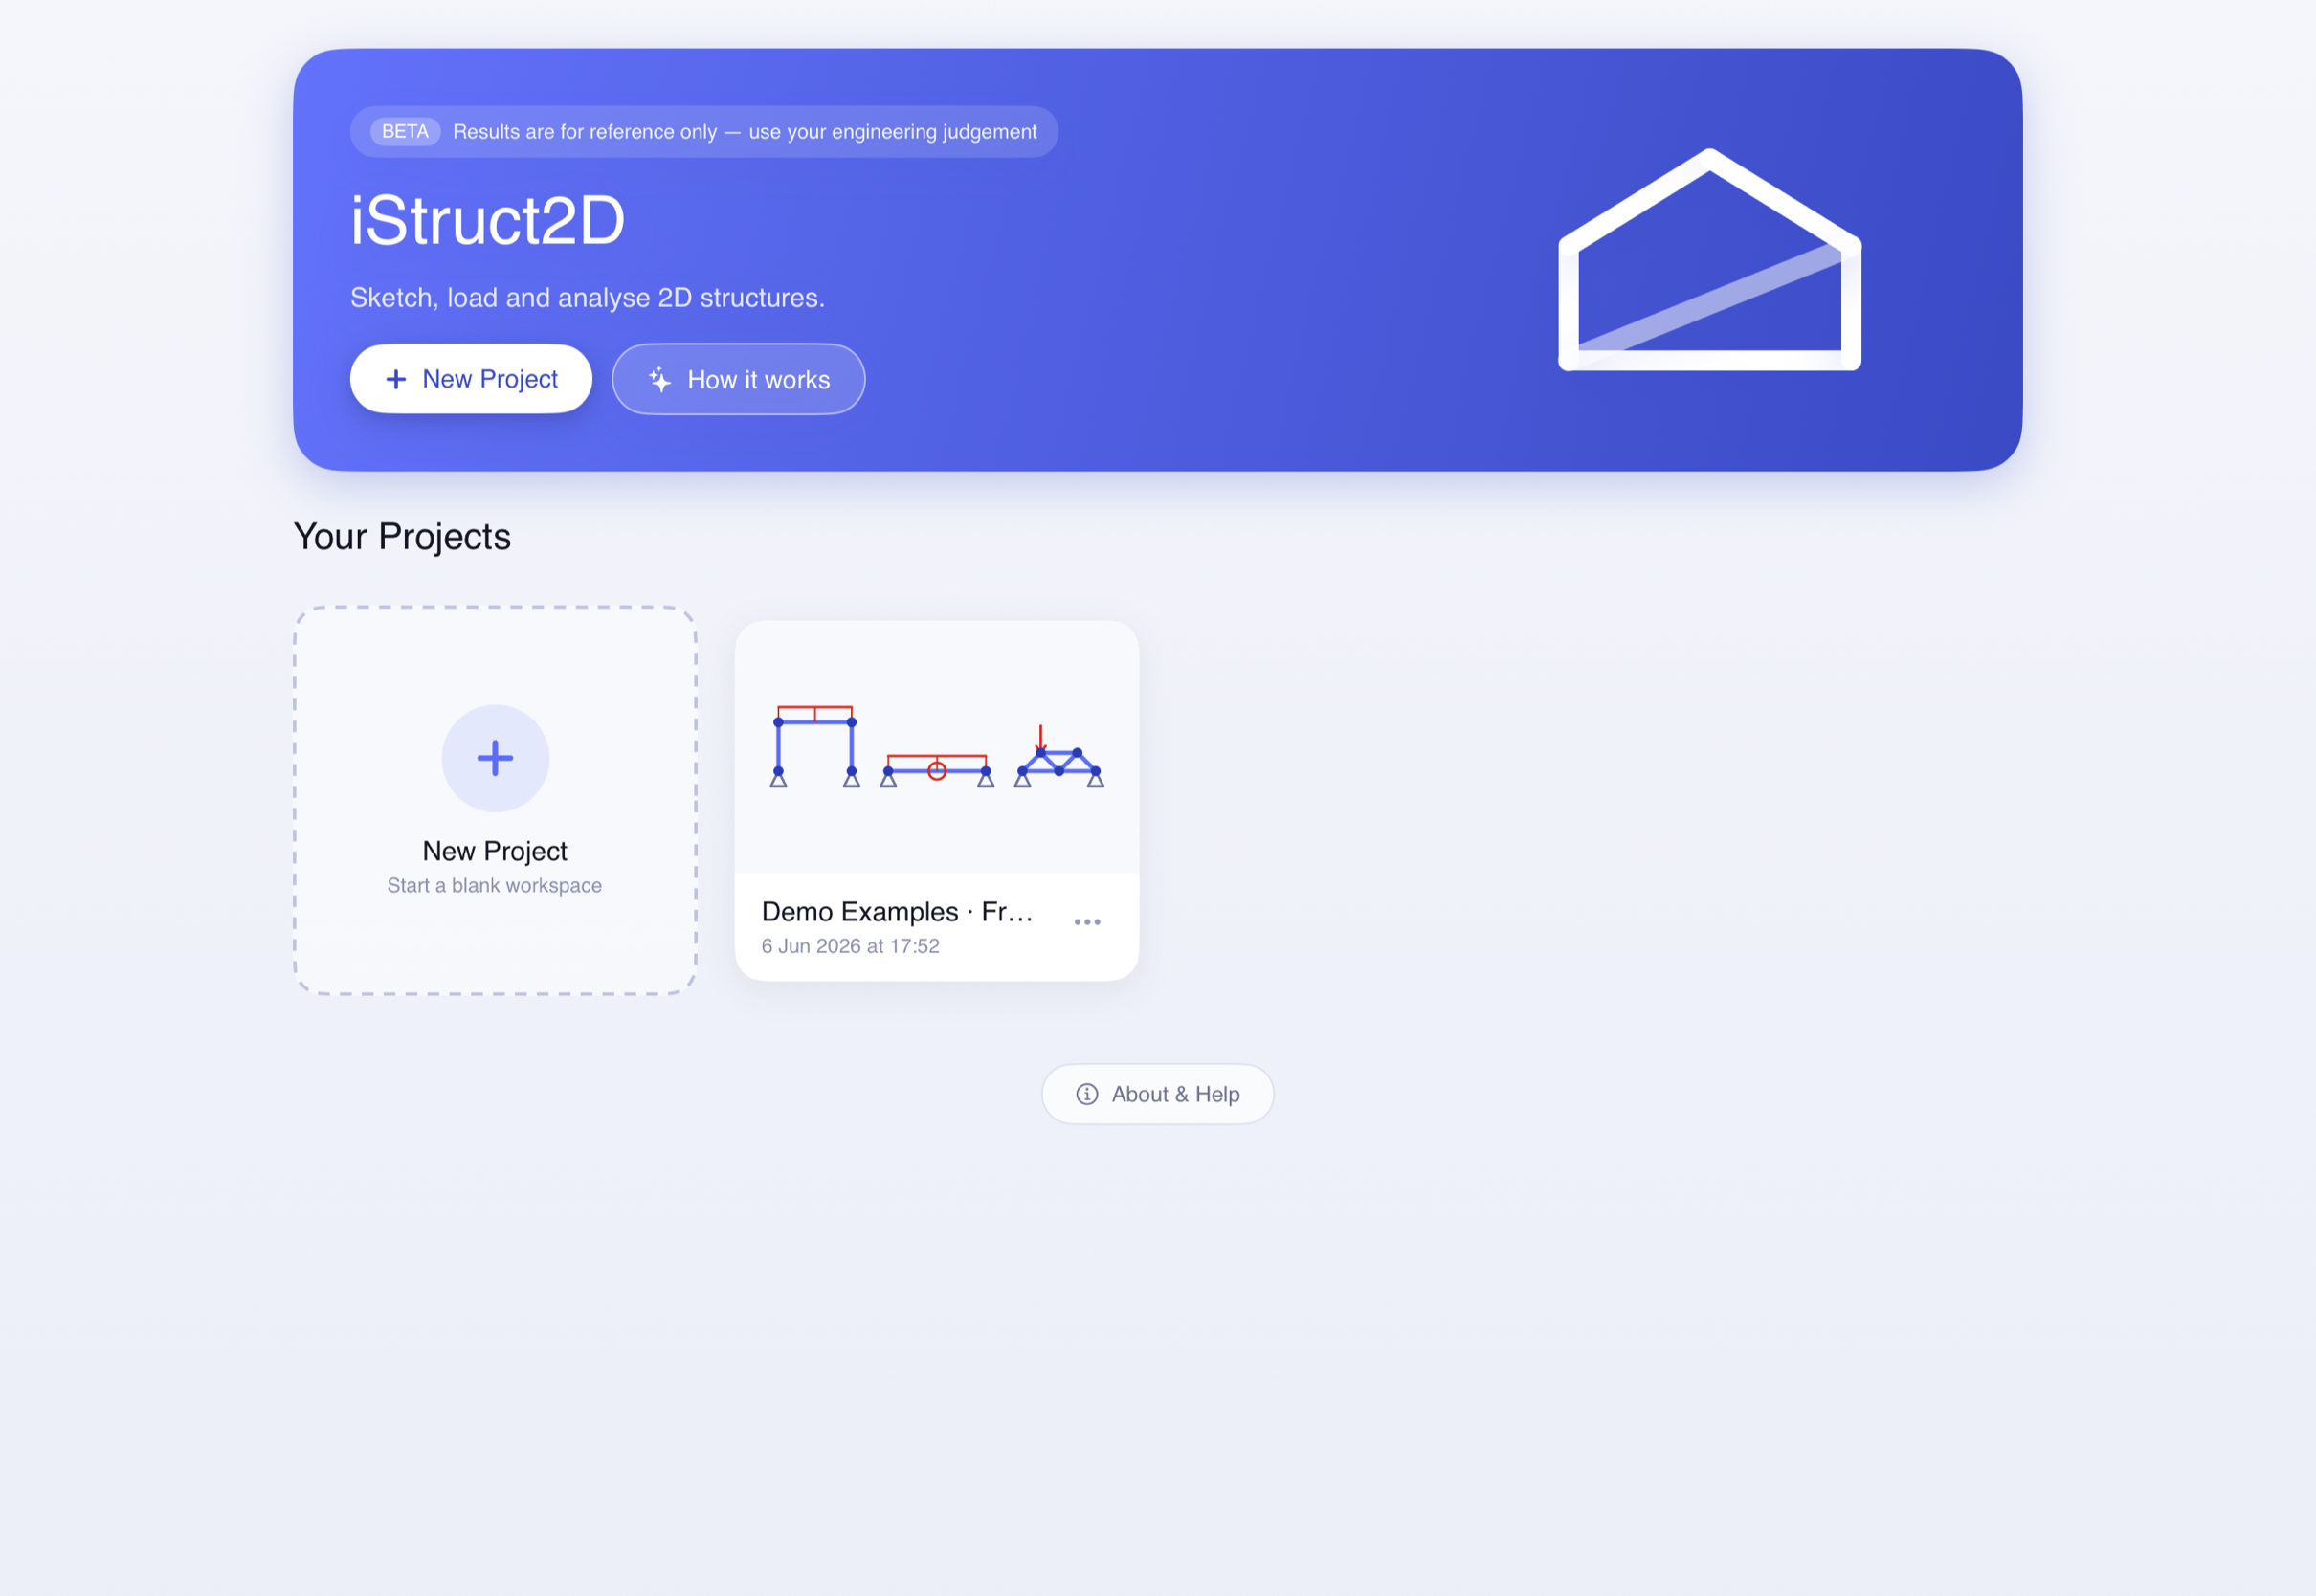
02
Getting started
When you open iStruct2D you land on the home screen: a hero card with the assembling logo, a New Project button, the How it works tour, and a grid of your saved projects.
New Project Creates a blank workspace and opens it straight away.
How it works Opens the seven-page animated walkthrough — draw, support, load, analyse, results, work faster.
Your projects Each card shows a live geometry preview, the project name and the last-modified time. Tap to open.
Manage Tap the ··· menu (or long-press a card) to Rename, Duplicate or Delete.
Demo Examples A bundled Frame, Beam & Truss project ships pre-installed — open it to explore a ready-made model.
The home screen — projects are saved locally on your device.
03
The workspace & canvas
The workspace is an infinite, grid-backed canvas. A tool dock runs down one edge, unit toggles sit beneath it, and Undo / Redo and Settings live in the top corner.
Pan & zoom
Drag with two fingers to pan; pinch to zoom from 1% to 800%. The view re-centres on the pinch point.
Grid & snapping
Show grid is on by default; Snap to grid (off by default) aligns new members as you draw. The two are independent.
Apple Pencil mode
Turn it on so the Pencil draws and edits while your fingers pan and zoom — keep a tool selected and navigate at the same time.
Undo / Redo
Step back and forward through up to 60 changes — including unit switches. The buttons grey out at the ends of the history.
Units
Two toggles switch Force (N · kN) and Length (mm · m). Switching only rescales the display — it never re-solves or corrupts your model.
Settings
The gear opens a four-tab sheet — General · Display · Analysis · Data — covering everything from grid options to sampling resolution.
04
Drawing members
A member is the structural element you draw — a beam, column or truss bar. Members are the building blocks of every structure.
1
Pick the Member tool
Select it from the tool dock. A hint confirms: “Member tool — drag on the canvas to draw.”
2
Drag to place it
Press, drag from the start point to the end point, and release. A live preview follows your finger or Pencil as you go.
3
Ends weld automatically
An endpoint dropped near an existing node joins to it — so chained members share nodes and a connected structure forms as you draw.
4
Type an exact length
Tap a finished member’s length label and key in the precise value on the number pad. The start point stays put while the member resizes.
Drawing aids do the tidying for you: endpoints snap to the grid and to existing nodes, duplicate members are rejected, and a minimum member length is enforced so nothing collapses to a point.
05
Selecting & editing
Tap anything to select it. A selection filter keeps your taps precise, and selected items expose editable values right on the canvas.
Selection filter Choose All · Members · Nodes · Loads · Structures so a tap only picks the kind of thing you mean.
Edit a member Tap it to reveal its length, x-length, y-length and angle — tap any label to type an exact value.
Move a node Tap a node to edit its X / Y coordinates; connected members and their loads re-align with it.
Whole structures With the Structures filter, tap to select a whole connected structure and drag it — a ghost preview shows where it will land.
Delete Tap the red ✕ on any selection frame to remove it.
Selecting a member exposes its exact length, angle and properties.
06
Supports
Supports restrain your structure against the ground. iStruct2D has the three classic types — and you can rotate each one before you drop it.
Pinned
Restrains both translations.
X · Y
Roller
Restrains one translation, perpendicular to its rolling surface.
X or Y
Fixed
Restrains both translations and rotation.
X · Y · M
Placing & orienting a support
Tap the support in the dock to rotate its orientation — each tap turns it 90° (up → right → down → left).
Drag it onto a node. A drop ring appears; it turns green the moment a node is in range.
Release to attach. Orientation matters most for the roller: facing left/right it holds X, facing up/down it holds Y.
For a pin or fixed support the direction only rotates the drawn glyph — they restrain the same degrees of freedom whichever way they face.
Facing up · restrains Y
07
Loads
Load a member the way it’s really loaded. Drag a load onto a member — the drop ring turns green when it will attach — then fine-tune its magnitude, direction and position.
PL
Point load
A force at a single point. Drag its circular handle to aim it — it snaps to horizontal/vertical within ~6° — or type an exact Angle to member or Global angle.
PM
Point moment
A concentrated moment at a point. The value is signed — positive is counter-clockwise, negative is clockwise.
UDL
Distributed load
A load spread along the member with separate start and end magnitudes — so it can be uniform, triangular or trapezoidal.
Distributed-load shape & direction
Set the starting and ending magnitudes to shape the load. Direction can follow the member or lock to the world:
Side A / Side B Perpendicular to the member — they re-align automatically when the member rotates or moves.
Up · Down · Left · Right Locked to the global axes — they stay in that world direction whatever the member’s angle.
Position Every load stores its distance from the start node and from the end node — the two always add up to the member’s length.
08
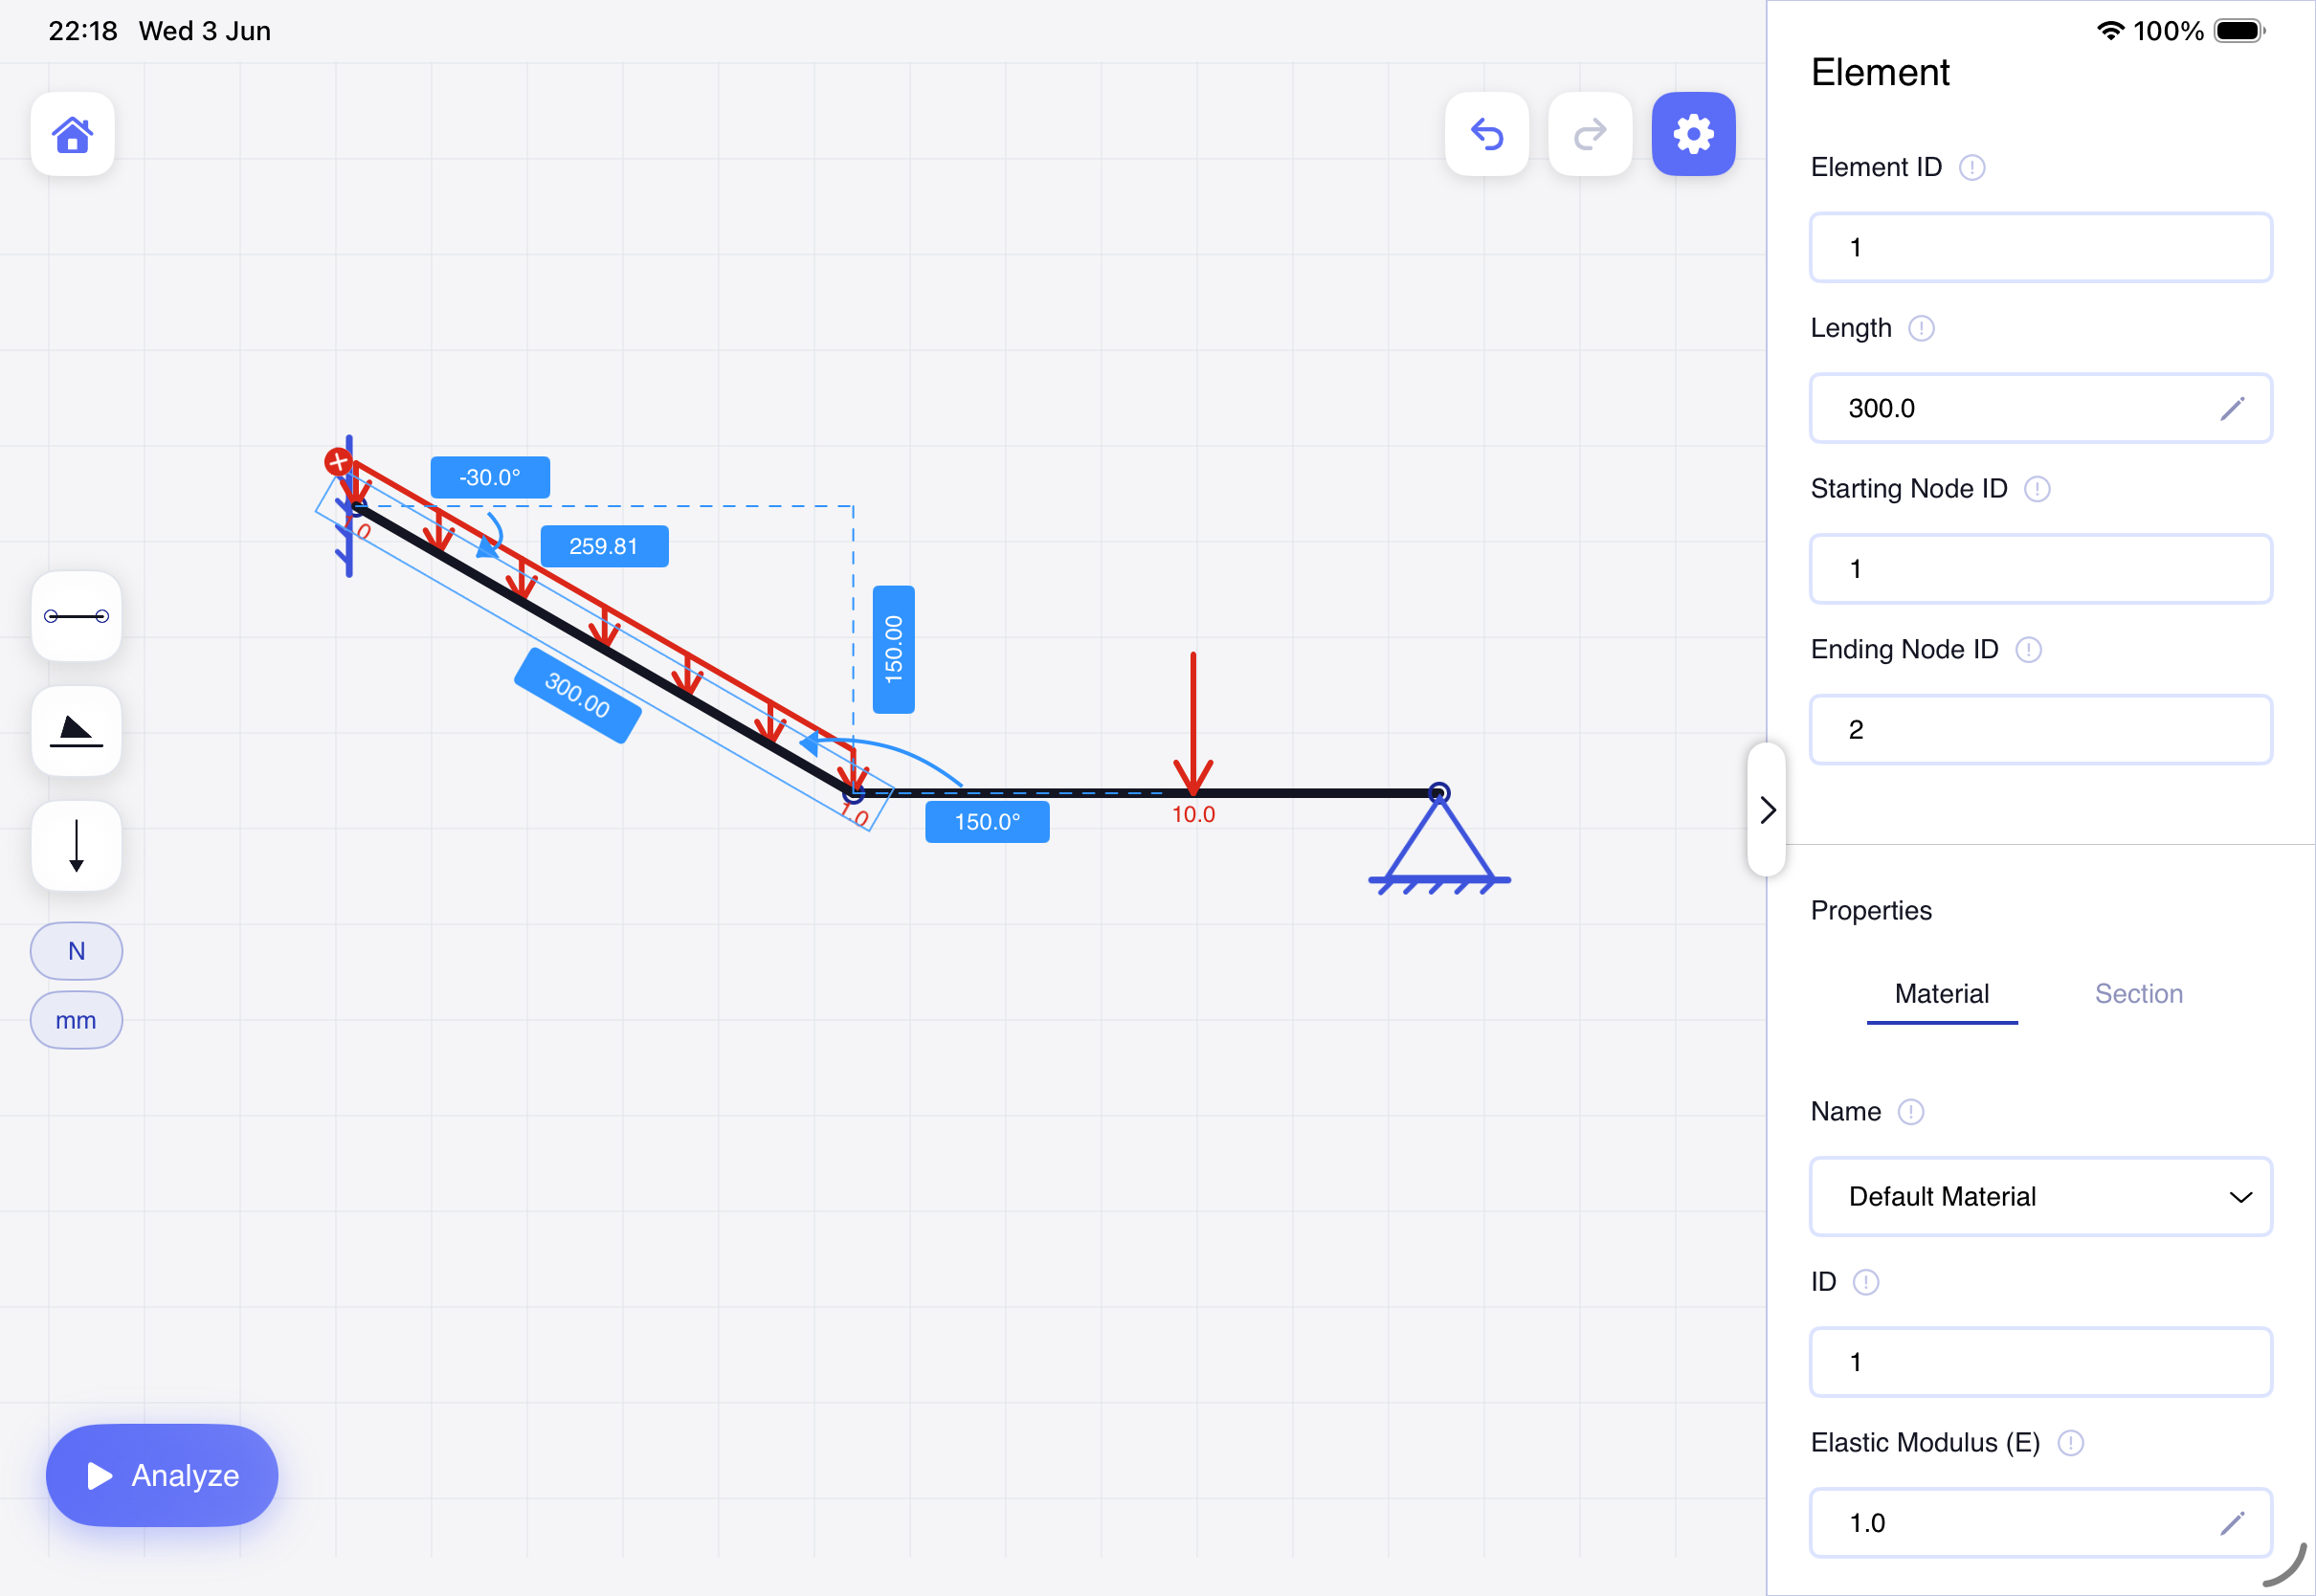
Materials & sections
Every member carries a material and a cross-section. Both come from shared libraries you build up as you go — edit one and every member using it updates.
E
Material
Has a Name and an Elastic Modulus (E), in N/mm² (MPa). Pick one from the library or add a new one; new entries start at E = 1.
A · I
Section
Has a Name, an Area (A) in mm² and a Second Moment of Area (I) in mm⁴. New entries start at A = 1, I = 1.
Materials and sections are global: changing a value updates every member assigned to it, and new members inherit the one you last used. Set up your library once and reuse it across the whole model.
09
Running the analysis
Tap the floating Analyse button. The solver runs the direct stiffness method on a background thread — the same matrix formulation used in professional software.
▶
One tap to solve
The button morphs into a 0–100% progress ring while it solves, then settles as Re-analyze. A green “Analysis complete” banner confirms success.
⧉
Many structures, each on its own
The workspace is split into independent connected structures and each is solved separately — so several beams, frames and trusses can share one canvas.
!
Instability is flagged, not fatal
A mechanism or under-restrained structure can’t be solved — it’s marked with a red dashed overlay and an Unstable badge, while the stable structures around it still solve and display.
↻
Stale results
Edit the model after solving and the results go out of date — a “Results are outdated — re-analyze” strip appears and the button pulses amber. Tap it to solve again.
If you see “Couldn’t analyze”, the structure isn’t fully restrained. As the app advises: add enough supports to fully restrain it, then analyze again.
10
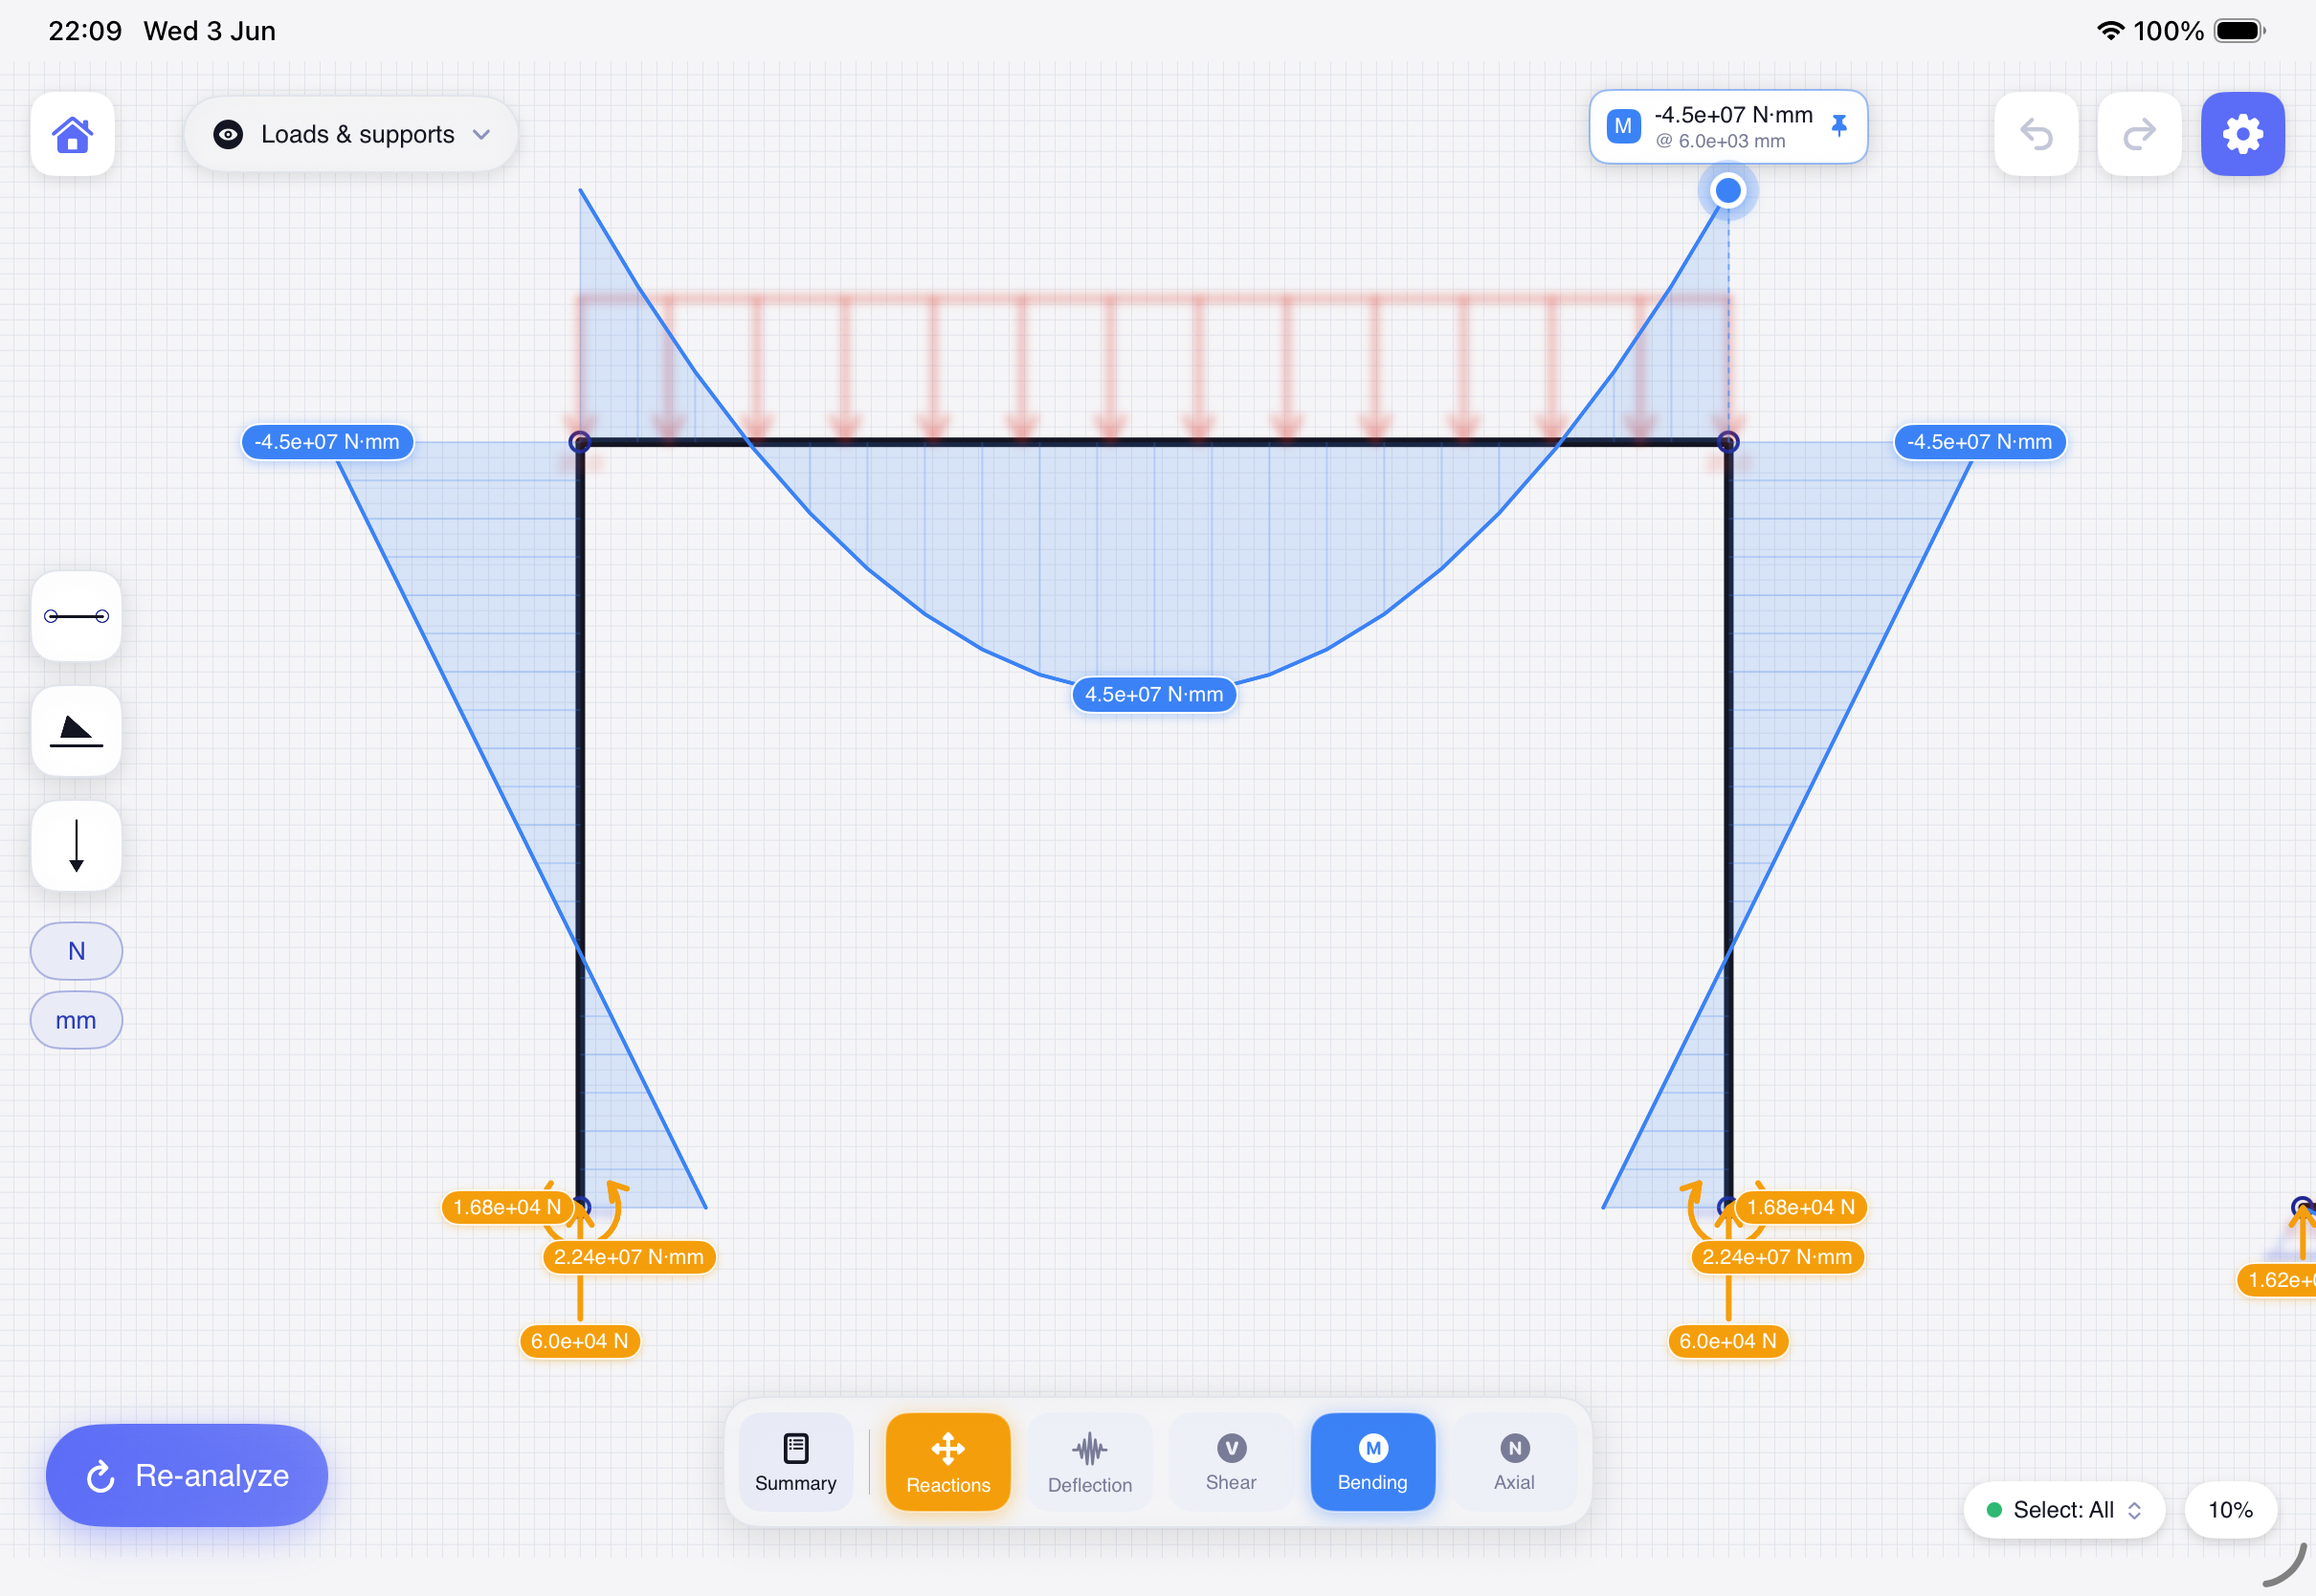
Reading the results
A frosted results toolbar appears with five independent layers. Toggle each on or off — and stack them, e.g. bending over the deflected shape. Tap the chips below to preview how they read.
An illustrative simply-supported beam — tap a layer to toggle it. In the app, these draw over your real structure.
Reactions R
Support forces and moments shown as scaled arrows. Tap a reaction to open a card with its Horizontal, Vertical and Moment components, then Show all to return.
Shear V
The internal shear-force diagram stepping along each member.
Bending M
The bending-moment diagram, with the maximum located for you.
Axial N
The axial-force diagram — tension and compression read at a glance across a truss.
Deflection δ
The exaggerated deflected shape, drawn over a dashed ghost of the undeformed structure.
Summary
Open Summary for the governing values — max bending moment, shear, axial, deflection and reaction — plus the solve time.
Keep the view readable
With results on, the loads and supports are auto-blurred behind the diagrams to declutter. Use the Loads & supports menu to set them to Show, Blur or Hide — or turn auto-blur off in Settings.
ShowBlurHide
Bending moments drawn over a solved portal frame.
11
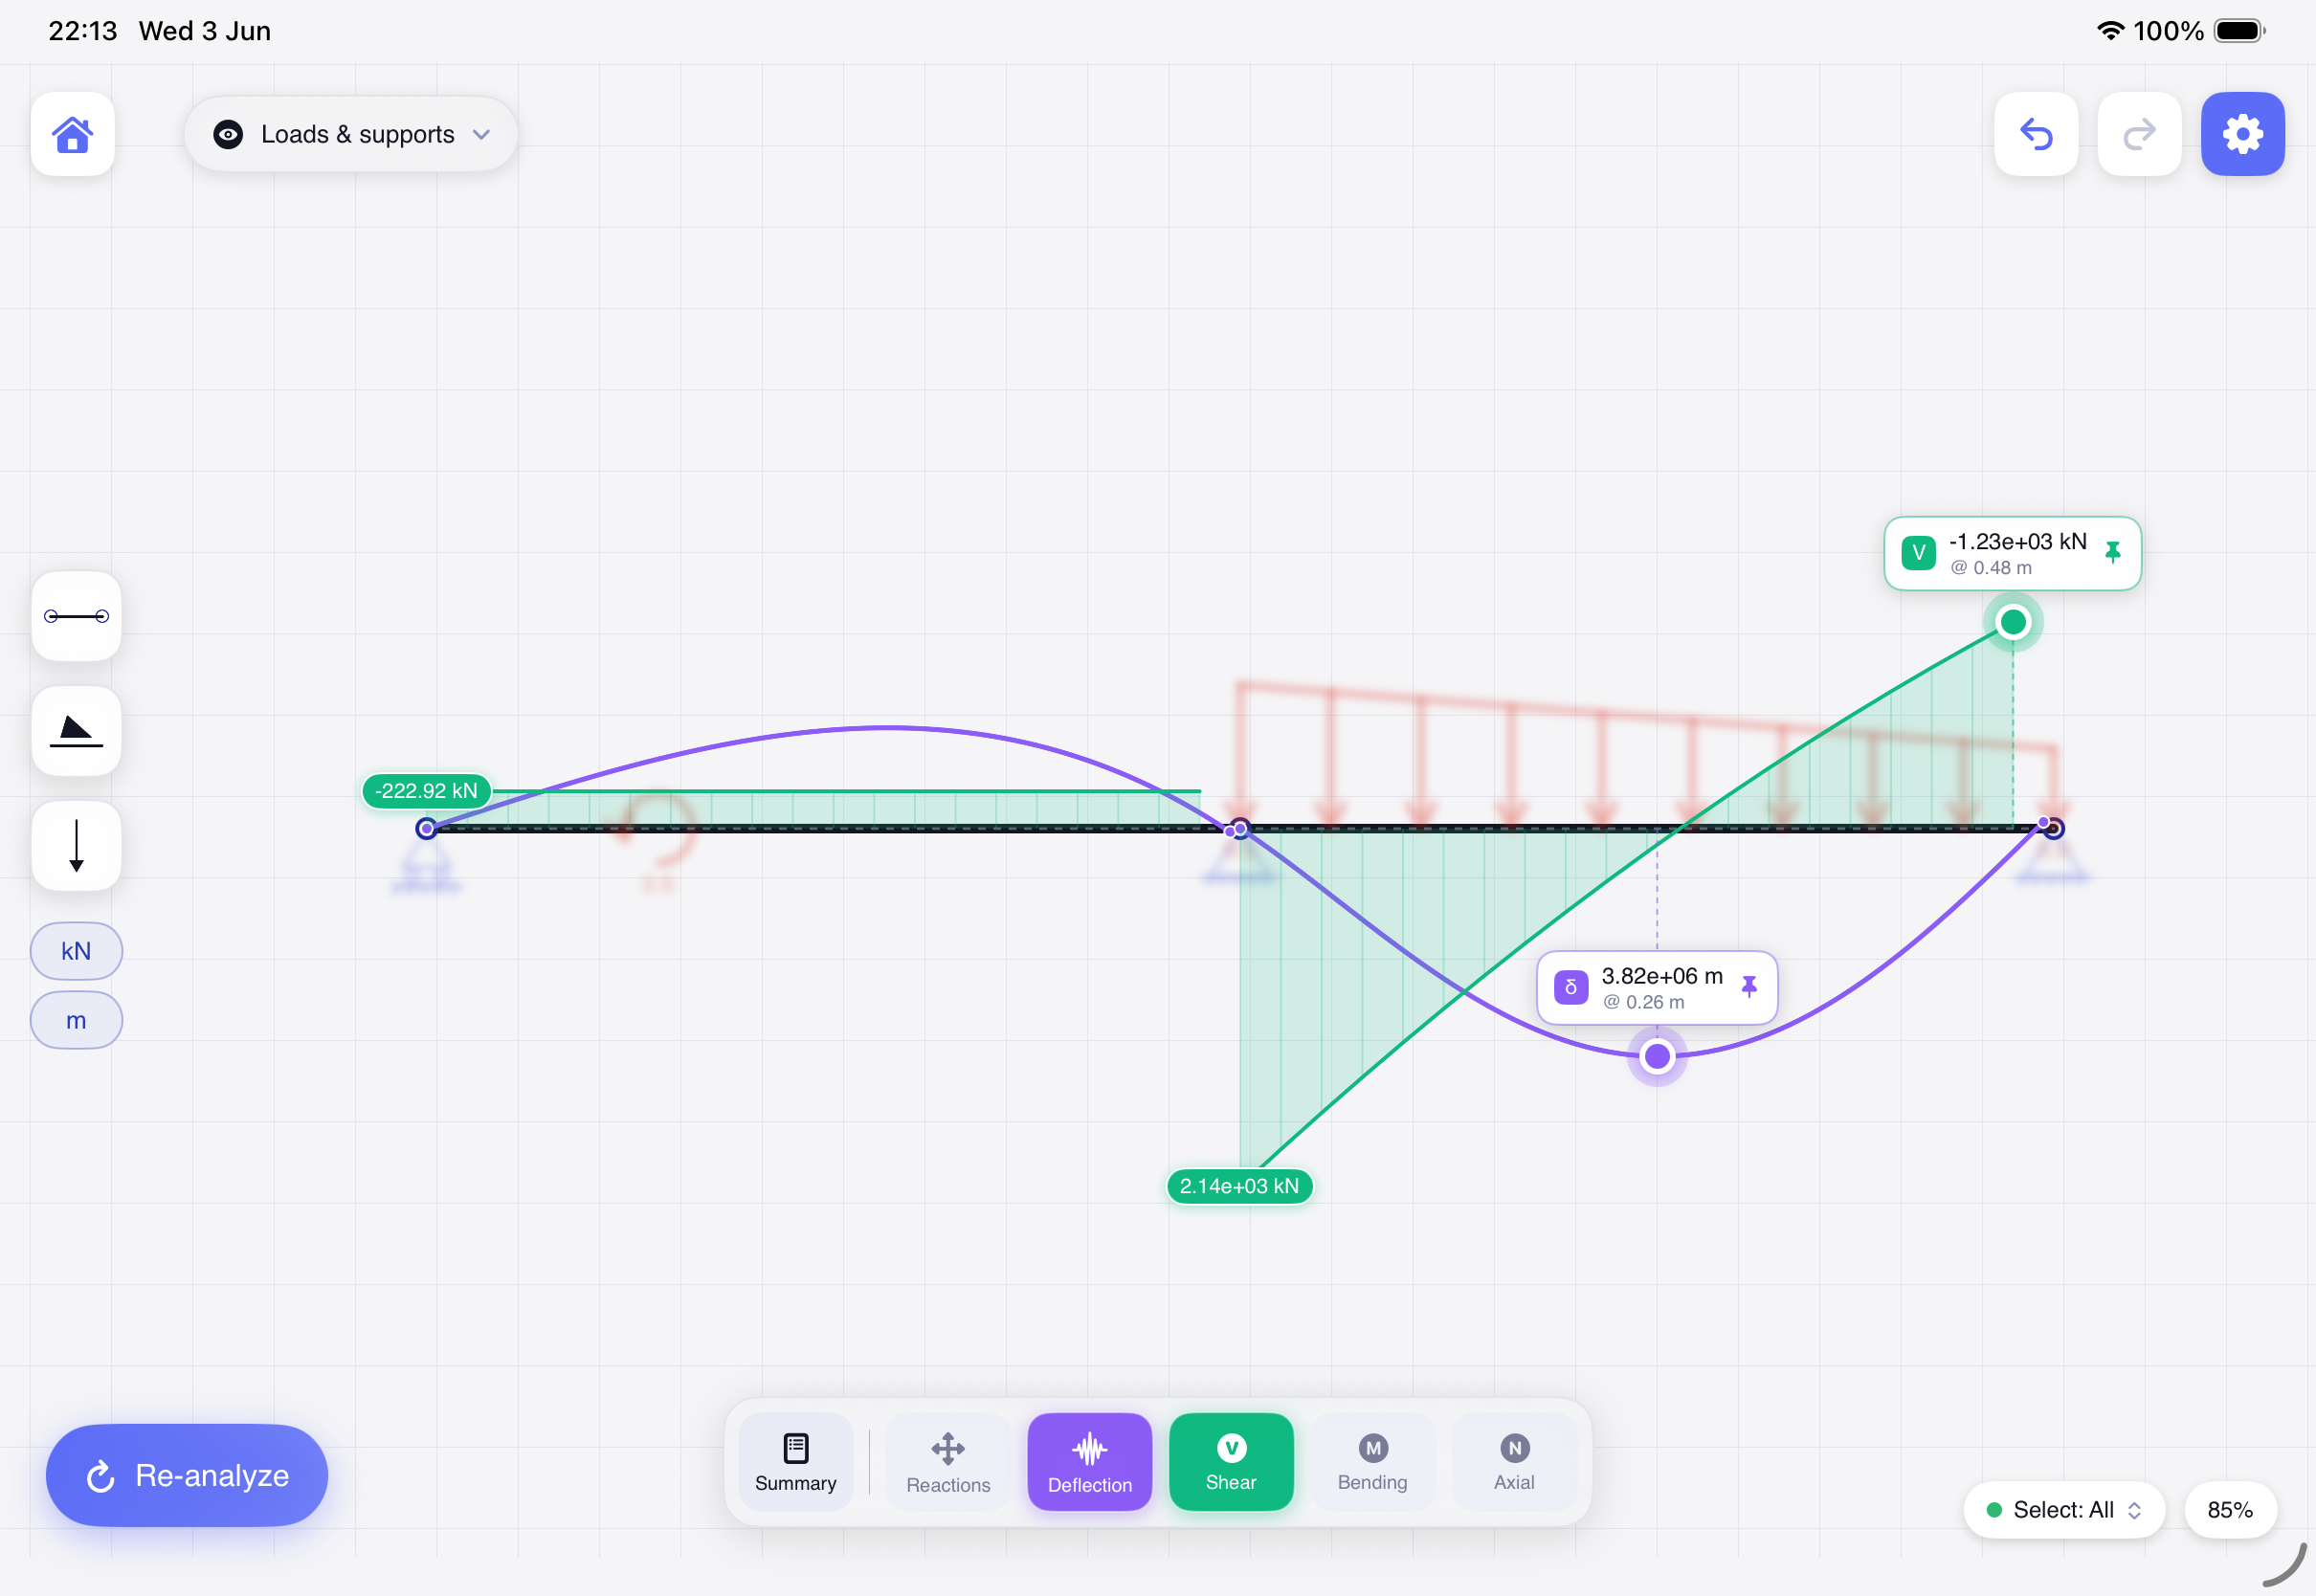
Inspecting exact values
Every diagram carries a draggable scrubber. Slide it along a member to read the exact value anywhere — not just at the peak.
Live readout A chip shows the layer code (M · V · N · δ), the value and the position, e.g. M @ 0.5 m.
Pin a marker Tap the readout to drop a permanent marker; tap a pinned label to remove it. Markers are independent per structure and per layer.
Critical values The governing maxima are located and labelled for you automatically.
Stations In Settings ▸ Analysis you can snap the scrubber to sampled stations and draw a dot at each one.
Scrub for exact values; criticals are found for you.
12
Settings reference
The gear opens a four-tab sheet. Here’s what each tab controls.
General
Project name, Apple Pencil mode, Show / Snap grid, Merge gap, Recenter view, and About (links to the tour and Terms).
Display
Size sliders for nodes, supports, members, loads and labels; a label-offset control; load-visibility toggles; and Reset display to defaults.
Analysis
Sampling resolution (4–80 per member), diagram size, deflection exaggeration, readout precision, critical-value & station options, and auto-blur.
Data
Share the project file, merge coincident nodes & members, remove unstable structures, and reset the workspace.
13
Projects, data & privacy
Your work stays on your device. Projects are saved locally as .istruct2d files — no account, no cloud sync, no tracking.
On-device & private
Every project is one local file. Back up your own work — you’re in control of it.
Share a project
In Settings ▸ Data, Share project file exports the .istruct2d file to back it up or send to another device.
Clean up
Merge coincident nodes & members welds duplicates; Remove unstable structures clears parts that can’t be solved.
Undo vs delete
Model edits undo up to 60 steps. Deleting a project, though, is permanent — it removes it from the device with no trash.
14
Tips & gestures
A quick reference for the gestures and shortcuts that make iStruct2D fast.
Two-finger dragPan the canvas
PinchZoom (1%–800%)
Drag a memberDraw it
Tap a length labelType an exact value
Tap a support in the dockRotate its orientation
Drag onto a node / memberAttach a support / load
Tap a load’s handleAim it (snaps at ~6°)
Long-press a projectRename · Duplicate · Delete
Drag the scrubberRead exact diagram values
Tap a readoutPin a marker
Ready to try it on your iPad?
The app teaches this same flow in one tap. Download it free from the App Store and sketch your first structure in seconds.
iStruct2D is in beta and intended for learning, exploration and preliminary reference. Results are for reference only and must be independently verified — always apply your own engineering judgement.